Poco ポコ

A cross-engine UI automation framework. Unity3D/cocos2dx-*/Android native APP/iOS native APP/(Other engines SDK)/…
Example
First you should connect your Android phone, for example, via usb cable and enable the ADB DEBUG MODE.
# coding=utf-8

import time
from poco.drivers.unity3d import UnityPoco

poco = UnityPoco()

poco('btn_start').click()
time.sleep(1.5)

shell = poco('shell').focus('center')
for star in poco('star'):
    star.drag_to(shell)
time.sleep(1)

assert poco('scoreVal').get_text() == "100", "score correct."
poco('btn_back', type='Button').click()
More examples here.
Tools for writing test scripts
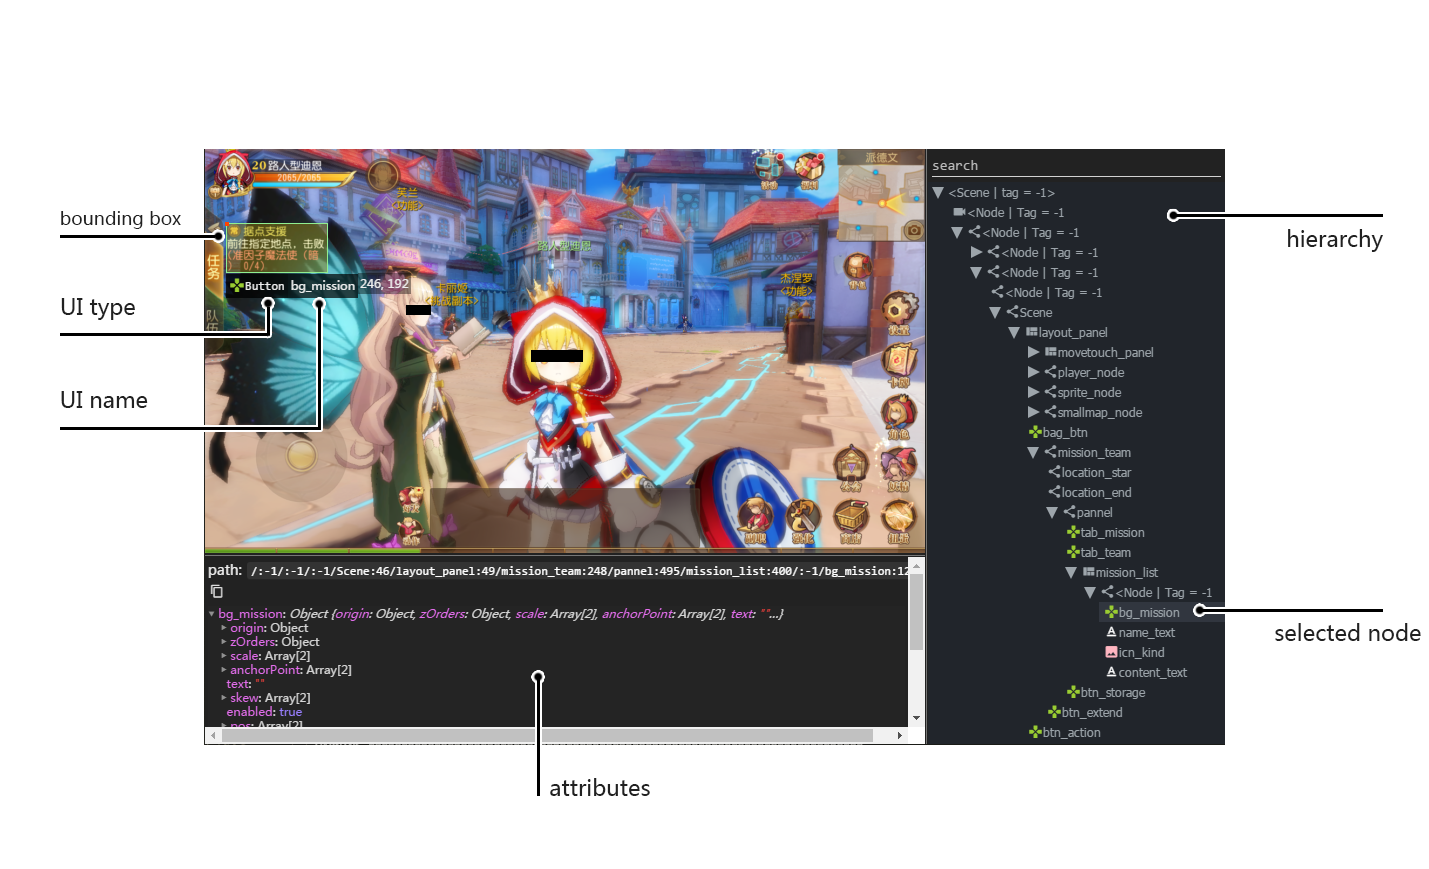
To retrieve the UI hierarchy of the game, please use our AirtestIDE (an IDE for writing test scripts) or standalone PocoHierarchyViewer (to view the hierarchy and attributes only but lightweight) !
Installation
In order to use Poco, you must install Poco python library on your host and also install the poco-sdk in your game/app.
Poco can be installed straightforward with pip command. It is called pocoui.
pip install pocoui
SDK Integration
For poco-sdk integration please refer to Integration Guide
Features
supports mainstream game engines, including: Unity3D, cocos2dx-js, cocos2dx-lua, Android/iOS native apps
retrieves UI Elements Hierarchy in game’s runtime
is super fast and impact-free to the game
allows straightforward SDK integration to the game (within in 5 minutes)
provides powerful APIs that are engine independent
supports multi-touch e.g. fling/pinch/… (and more is coming soon)
support gps, accelerometer and gyro sensors, rotation (landscape/portrait) and other sensors as input (coming soon)
is extensible to other private engines by implementing poco-sdk .
is compatible with Python 2.7 and Python 3.3-3.6.
Documentation
Use poco on platforms/engines
This section guide you how to start to use poco to write your test cases on different platforms/engines.
Tutorials and examples
This section will let your know all basic features of poco.
How to use Poco
Poco supports different types of engines by different drivers. For different engines please initialize poco instance
by corresponding driver. Remember to connect an Android device to your PC/mac with a running game or launch and keep
the game/app active on PC/mac.
Following example shows how to initialize poco instance for
Unity3D.
from poco.drivers.unity3d import UnityPoco

poco = UnityPoco()
# for unity editor on windows
# poco = UnityPoco(('localhost', 5001), unity_editor=True)

ui = poco('...')
ui.click()
Android native APP
from poco.drivers.android.uiautomation import AndroidUiautomationPoco

poco = AndroidUiautomationPoco()
poco.device.wake()
poco(text='Clock').click()
for other engines, refer to Poco drivers for more details. If poco drivers does not support your engine, please refer to Integration Guide.
Working with Poco Objects
Basic Selector
UI element objects can be selected by invoking poco(...) function instance. The function traverses through the
render tree structure and selects all the corresponding UI elements matching the query expression.
The function takes one mandatory argument node name, the optional arguments can be substituted too and they refer to specific node properties. For more information, refer to API Reference selecting UI.
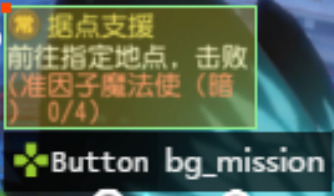
# select by node name
poco('bg_mission')

# select by name and other properties
poco('bg_mission', type='Button')
poco(textMatches='^据点.*$', type='Button', enable=True)
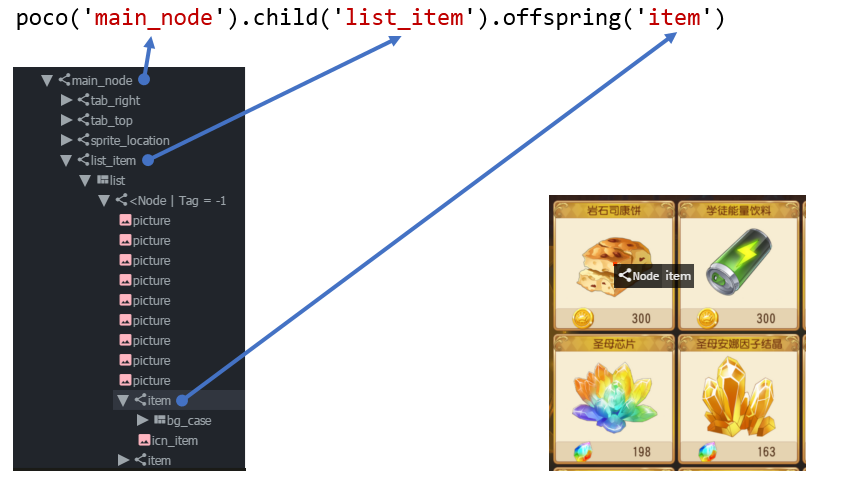
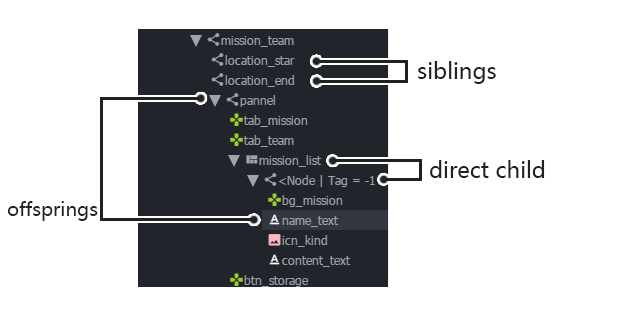
Relative Selector
When there is any ambiguity in the selected objects by node names/node types or object unable to select, the relative selector tries to select the element object by hierarchy in following manner
# select by direct child/offspring
poco('main_node').child('list_item').offspring('item')
Sequence Selector
Tree indexing and traversing is performed by default from up to down or from left to right. In case that the ‘not-yet-traversed’ nodes are removed from the screen, the exception is raised. The exception is not raised in case when the ‘already-traversed’ nodes are removed and in this case the traversing continues in previous order despite the fact that the nodes in views were rearranged during the travers process.
items = poco('main_node').child('list_item').offspring('item')
print(items[0].child('material_name').get_text())
print(items[1].child('material_name').get_text())
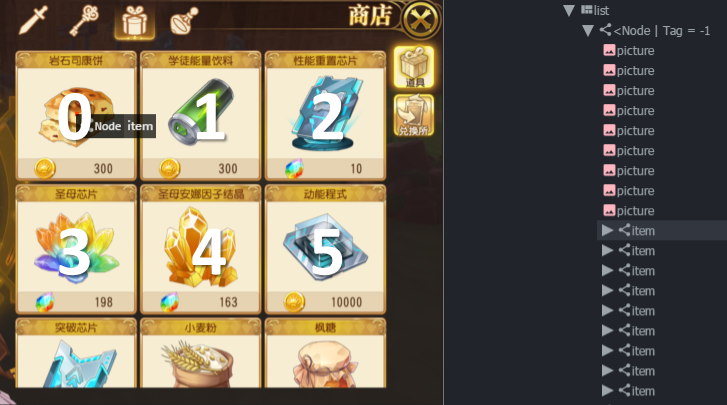
Iterate over a collection of objects
Following code snippet shows how to iterate over the collection of UI objects
# traverse through every item
items = poco('main_node').child('list_item').offspring('item')
for item in items:
    item.child('icn_item')
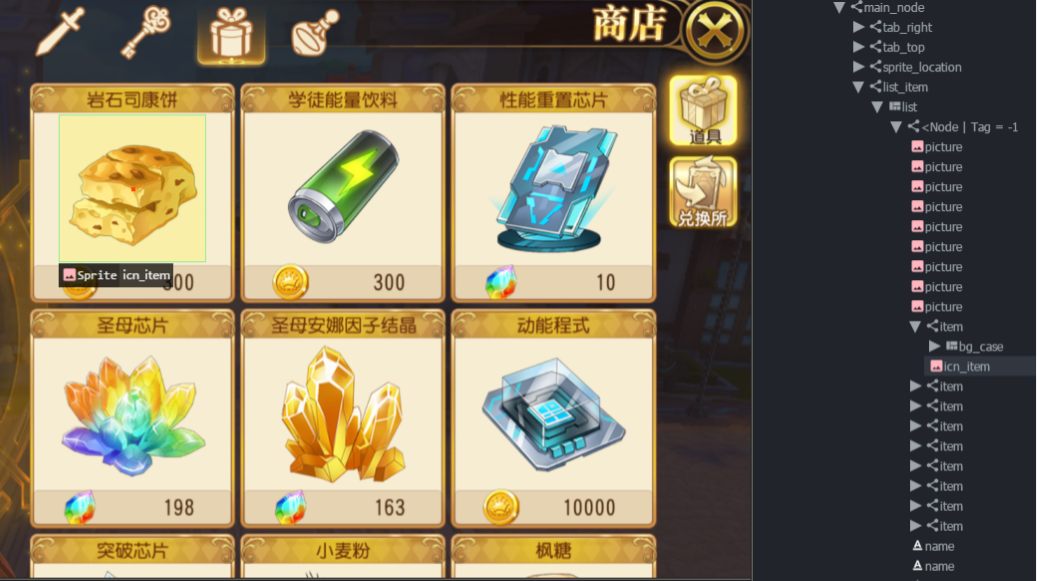
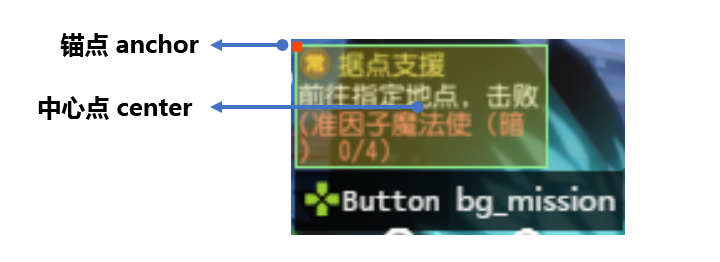
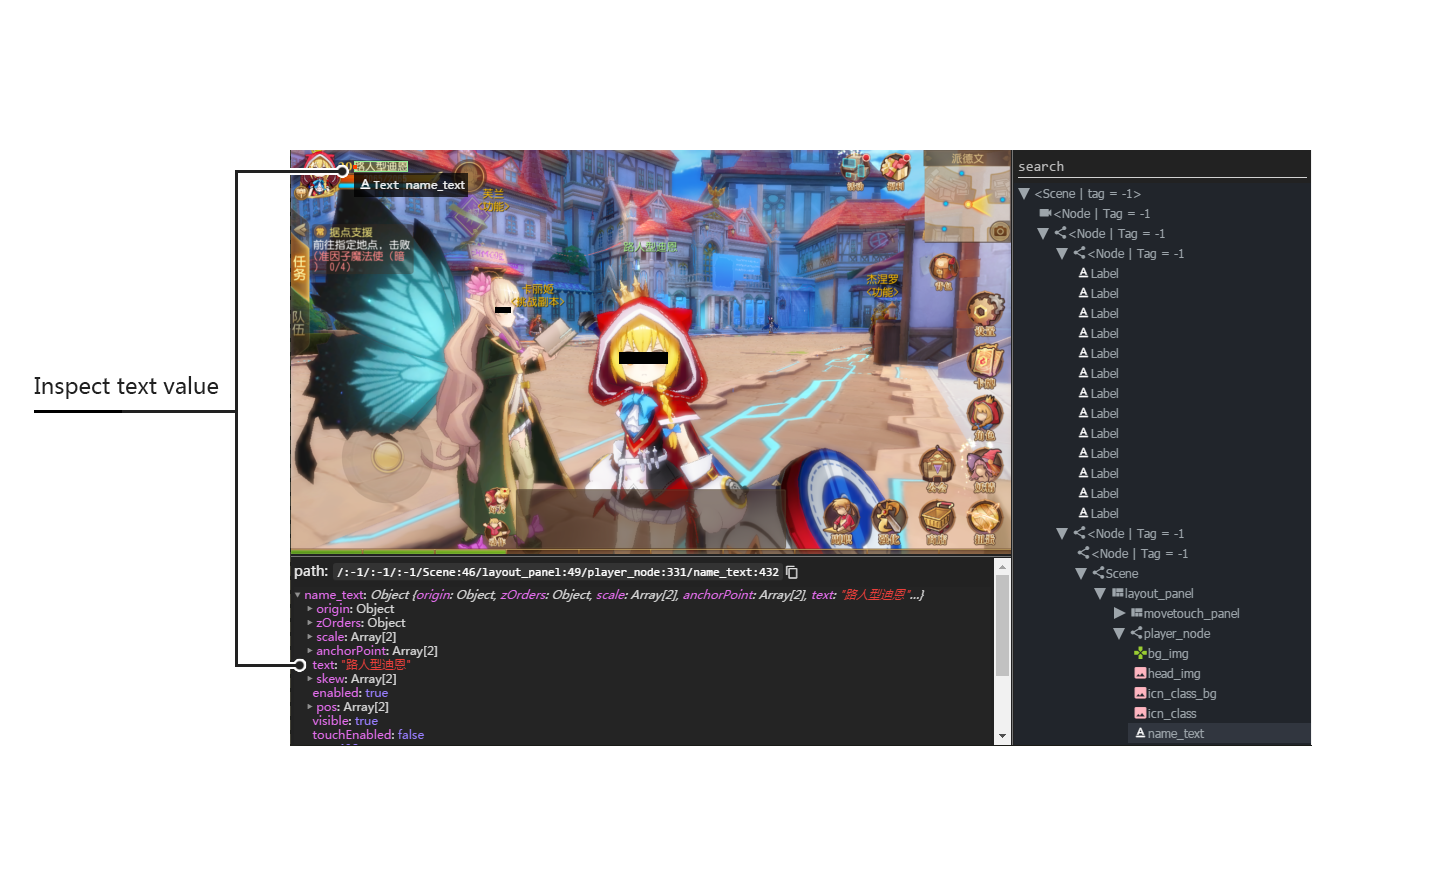
Get object properties
Following examples shows how to obtain various properties of an object
mission_btn = poco('bg_mission')
print(mission_btn.attr('type'))  # 'Button'
print(mission_btn.get_text())  # '据点支援'
print(mission_btn.attr('text'))  # '据点支援' equivalent to .get_text()
print(mission_btn.exists())  # True/False, exists in the screen or not
Object Proxy Related Operation
This section describes object proxy related operations
click
The anchorPoint of UI element is attached to the click point by default. When the first argument
(the relative click position) is passed to the function, the coordinates of the top-left corner of the bounding box
become [0, 0] and the bottom right corner coordinates are [1, 1]. The click range area can be less than 0 or
larger than 1. If the click range area lies in the interval (0, 1), it means it is beyond the bounding box.
Following example demonstrates how to use click function
poco('bg_mission').click()
poco('bg_mission').click('center')
poco('bg_mission').click([0.5, 0.5])    # equivalent to center
poco('bg_mission').focus([0.5, 0.5]).click()  # equivalent to above expression
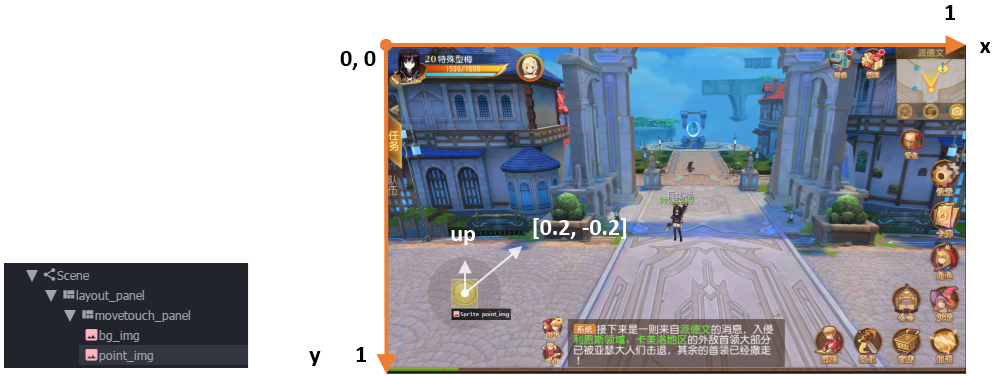
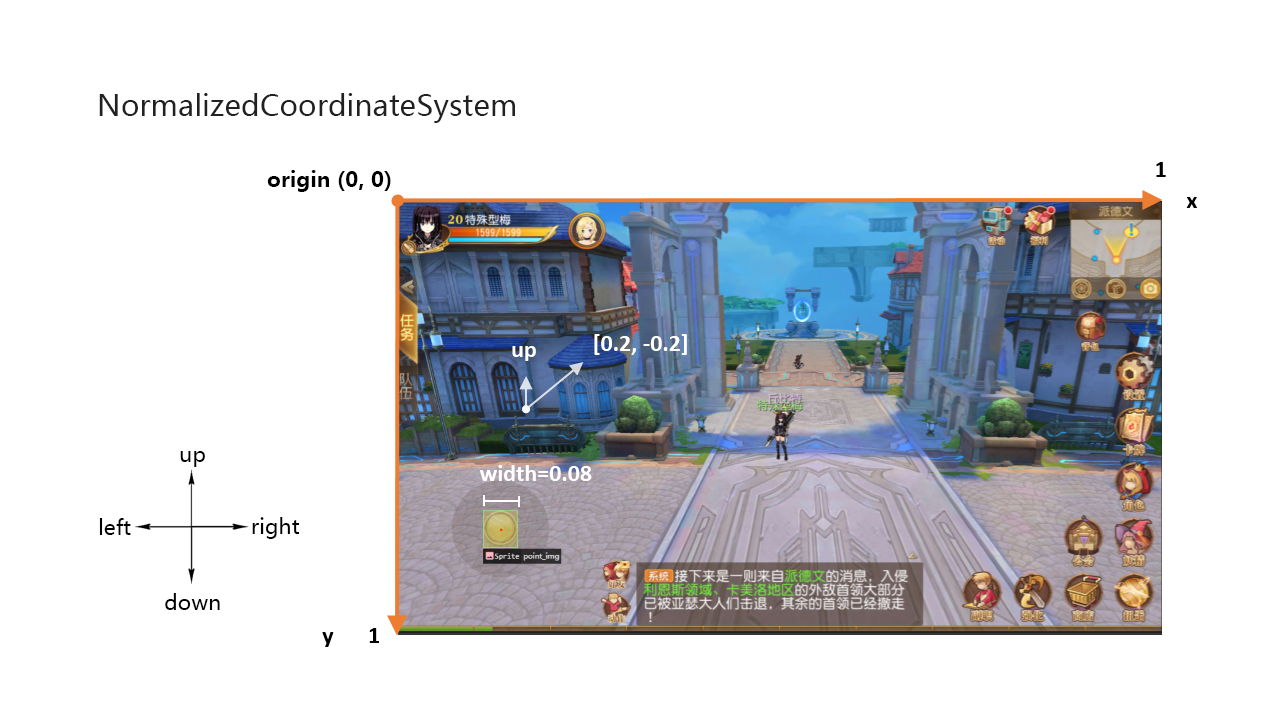
swipe
The anchorPoint of UI element is taken as the origin, the swipe action is performed towards the given direction with the certain distance.
Following example shows how to use the swipe function
joystick = poco('movetouch_panel').child('point_img')
joystick.swipe('up')
joystick.swipe([0.2, -0.2])  # swipe sqrt(0.08) unit distance at 45 degree angle up-and-right
joystick.swipe([0.2, -0.2], duration=0.5)
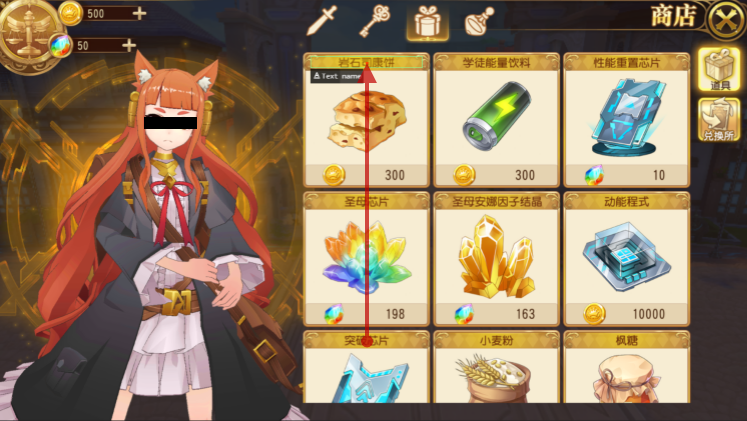
drag
Drag from current UI element to the target UI element.
Following example shows how to use the drag_to function
poco(text='突破芯片').drag_to(poco(text='岩石司康饼'))
focus (local positioning)
The anchorPoint is set as the origin when conducting operations related to the node coordinates. If the the local click
area is need, the focus function can be used. The coordinate system is similar to the screen coordinates - the origin
is put to the top left corner of the bounding box and with length of unit of 1, i.e the coordinates of the center are
then [0.5, 0.5] and the bottom right corner has coordinates [1, 1].
poco('bg_mission').focus('center').click() # click the center
The focus function can also be used as internal positioning within the objects. Following example demonstrates the implementation of scroll operation in ScrollView.
scrollView = poco(type='ScollView')
scrollView.focus([0.5, 0.8]).drag_to(scrollView.focus([0.5, 0.2]))
wait
Wait for the target objects to appear on the screen and return the object proxy itself. If the object exists, return immediately.
poco('bg_mission').wait(5).click()  # wait 5 seconds at most,click once the object appears
poco('bg_mission').wait(5).exists()  # wait 5 seconds at most,return Exists or Not Exists
Global Operation
Poco framework also allows to perform the operations without any UI elements selected. These operations are called global operations.
click
poco.click([0.5, 0.5])  # click the center of screen
poco.long_click([0.5, 0.5], duration=3)
swipe
# swipe from A to B
point_a = [0.1, 0.1]
center = [0.5, 0.5]
poco.swipe(point_a, center)

# swipe from A by given direction
direction = [0.1, 0]
poco.swipe(point_a, direction=direction)
snapshot
Take a screenshot of the current screen in base64 encoded string. The image format depends on the sdk implementation. Take a look at ScreenInterface.getScreen to dive into sdk implementation details.
Note: snapshot is not supported in some engine implementation of poco.
from base64 import b64decode

b64img, fmt = poco.snapshot(width=720)
open('screen.{}'.format(fmt), 'wb').write(b64decode(b64img))
Exceptions
This sections describes the Poco framework errors and exceptions.
PocoTargetTimeout
from poco.exceptions import PocoTargetTimeout

try:
    poco('guide_panel', type='ImageView').wait_for_appearance()
except PocoTargetTimeout:
    # bugs here as the panel not shown
    raise
PocoNoSuchNodeException
from poco.exceptions import PocoNoSuchNodeException

img = poco('guide_panel', type='ImageView')
try:
    if not img.exists():
        img.click()
except PocoNoSuchNodeException:
    # If attempt to operate inexistent nodes, an exception will be thrown
    pass
Unit Test
Poco is an automation test framework. For unit testing, please refer to PocoUnit section. PocoUnit provides a full
set of assertion methods and furthermore, it is also compatible with the unittest in Python standard library.
Some Concepts
This section describes some basic concepts of Poco. Basic terminology used in following section
Target device: test devices where the apps or games run on, it usually refers to mobile phone devices
UI proxy: proxy objects within Poco framework, they represent zero (none), one or multiple in-game UI elements
Node/UI element: UI element instances or nodes in app/game
query expression: a serializable internal data structure through which Poco interacts with target devices and selects the corresponding UI elements. It is not usually needed to pay much attention to this unless it is required to customize the
Selectorclass.
Following images show the UI hierarchy represented in Poco
Definitions of coordinate system and metric space
Normalized Coordinate System
In normalized coordinate system, the origin (0, 0) lies on top left corner of the device display. The height and the width of the screen are chosen as 1 unit of length, refer to image below for more detailed information. In normalized coordinate system, the same UI elements on the devices with different resolution have always the same position and size. This is especially very handy when writing cross-device test cases.
The space of normalized coordinate system is uniformly distributed, i.e. the coordinates of the screen center are (0.5, 0.5) and the computing method of other scalars and vectors are all same in Euclidean space.
Local Coordinate System (local positioning)
The aim of introducing local coordinate system is to express the coordinates with reference to a certain UI elements. The origin (0,0) of local coordinate system lies on the top left corner of UI bounding box, x-axis goes horizontally rightward direction and y-axis goes vertically downwards. The height and the width of UI element are chosen as 1 unit of length. Coordinates are expressed as signed distances from the origin. Other definitions are same as for normalized coordinate system.
Local coordinate system is more flexible in order to locate the position within or outside of UI element, e.g the coordinates at (0.5, 0.5) corresponds to the center of the UI element while coordinates larger than 1 or less than 0 correspond to the position out of the UI element.
Join to discuss!
Contributions
Any pull requests are welcomed! We will have the code checked carefully. Please make sure the codes are compatible with python 2/3 and have the same coding style.